How to Recover Files from Emptied Recycle Bin?
Here is the finest solution to recover files after emptying the Recycle Bin folder- the My File Recovery tool. Straightaway download and launch the free My File Recovery software on your PC and allow the tool to scan the storage drive for deleted files. Once the scan process is complete, it offers a free preview of the regained files before even purchasing the license of the software. Get it now for free!!!


Requirements: Microsoft Windows 10, Windows 8, Windows 7, Windows Vista, Windows XP, Windows 2003, and Windows 2008


Requirements: Mac OS X High Sierra, Sierra, El Capitan, Yosemite, Mavericks, Snow Leopard, Leopard, Mountain Lion, and Lion
The best approach to retrieve files from the emptied Recycle bin
Incidents of losing valuable data loss by clearing the Windows recycle bin could be rather troublesome to any user. Files mistakenly deleted by the user are not yet permanently erased from the physical media and there exist ways to undelete files. Recycle Bin gives the user a second chance to restore files emptied or deleted from the recycle bin folder. But sometimes you might even accidentally empty the recycle bin folder which cannot be manually recovered using any option on your Windows system. In this case, file recovery from an emptied recycle bin can be achieved using a good Windows file recovery software.
Scenarios leading to permanent deletion of files from Windows system-
- Shift + Delete command: Unintentionally deletion of files, by pressing the Shift + Delete keys
- Exceeded size: The files get permanently deleted by bypassing the recycle bin due to exceeded file size
- Accidentally emptying the Recycle bin: When you accidentally empty the Recycle bin, the files get permanently erased from its file location
Whenever a file is been deleted via emptying the recycle bin folder or pressing Shift + Delete command, the index file entry is deleted and is set free space for saving new data. Therefore, soon after file deletion, you need to stop using the computer in order to avoid overwriting of new data that can lead to a permanent data loss. Then with the help of trustworthy file recovery tools like My File Recovery you can easily get back permanently deleted files.
The finest tool restore emptied recycle bin- My File Recovery
My File Recovery tool is a perfectly designed toolkit to regain files and folders deleted after emptying the Windows Recycle Bin. The tool makes use of the unique file signatures to locate any missing or deleted folders from the Windows system drives. It recovers deleted files from external hard drives, memory cards, pen drives, SSD, iPods, memory sticks, etc. To know more about data recovery from removable storage drives, visit this link: https://www.myfilerecovery.net/removable-disk-deleted-file-recovery.html.
This application is powerful in retrieving all file formats of documents, images, audio, video, etc. Click this link https://www.myfilerecovery.net/word-document-file-recovery-tool.html for additional information about MS Word document recovery using this software. My File Recovery application also helps you to perform file recovery after format, re-format, re-partition, corruption, etc. When the software finishes a deep scan on the drive, it lists all the regained file items in a preview window. Here you can easily locate your files as they will be sorted based on their filename, size, creation date, and modified date. So, try the demo version of this software on any edition of Windows system and get back your vital files within clicks.
Note: You can also perform file recovery after system restore operation easily using this amazing My File Recovery utility.
Requirements: Microsoft Windows 10, Windows 8, Windows 7, Windows Vista, Windows XP, Windows 2003, and Windows 2008
Requirements: Mac OS X High Sierra, Sierra, El Capitan, Yosemite, Mavericks, Snow Leopard, Leopard, Mountain Lion, and Lion
Steps to recover files from emptied Recycle Bin
Step 1: Download the My File Recovery tool on your Windows system.
Step 2: Choose the Recover Files option available on the home window.
Step 3: Browse the drive that stores the Recycle Bin folder and click on the Scan icon.

Figure 1: Main Screen
Step 4: Wait for the program to finish the scan process.

Figure 2: Scanning for files
Step 5: Check the recovered files under Data View and File Type View panes.

Figure 3: Recovery results
Step 6: Continue to preview any of the file items and then mark them for saving.
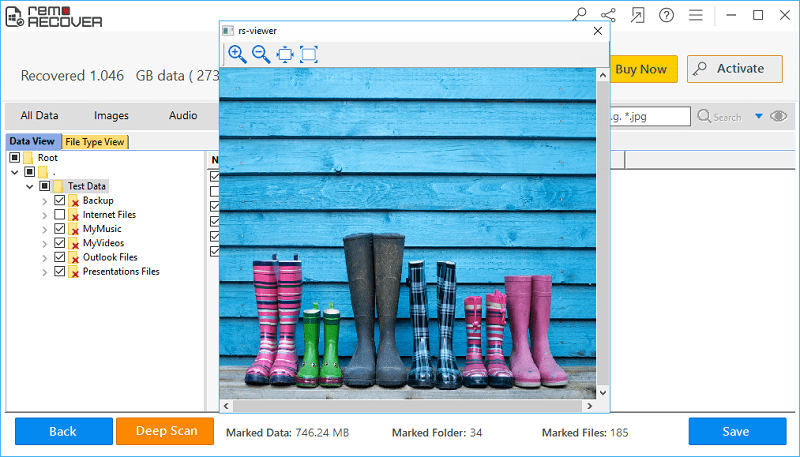
Figure 4: Preview Window
Step 7: Now choose an appropriate drive location to save the files revived after emptying the recycle bin folder and hit on the Save button.
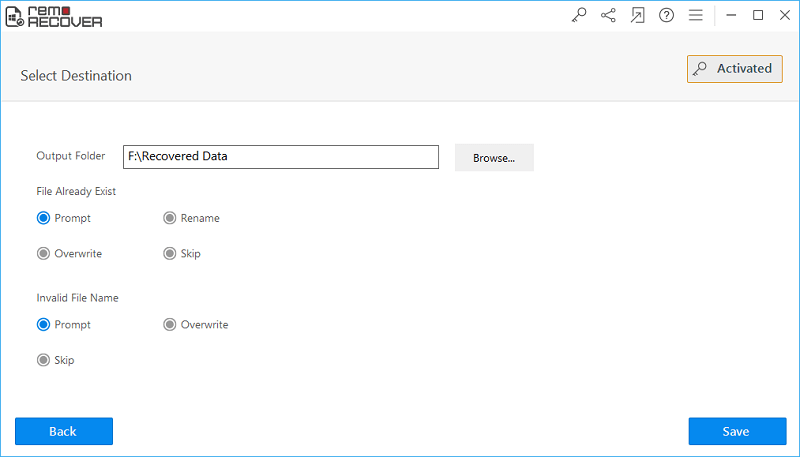
Figure 5: Save Recovered Files
Requirements: Microsoft Windows 10, Windows 8, Windows 7, Windows Vista, Windows XP, Windows 2003, and Windows 2008
Requirements: Mac OS X High Sierra, Sierra, El Capitan, Yosemite, Mavericks, Snow Leopard, Leopard, Mountain Lion, and Lion